Wednesday, December 19, 2012

Candy Cane Hershey's Kiss Cookies

I kind of came upon this recipe accidentally. I needed to buy some chocolate Hershey's kisses for another recipe. But I had a coupon for $1.10 off 2 and they were on sale so I had to buy 2 bags. I thought I would try the candy cane kisses and I am so glad I did! The recipe is actually on the back of the package and it is amazing! I used green and red sprinkles and nonpareils instead of colored sugar like they recommend but otherwise I followed the recipe. I think you could use any kind of sprinkle you like as long as they aren't too big. These cookies do not only taste good but are also very cute! I just love a cute yummy cookie!


Matias helped me put the kisses in place so sorry if they aren't perfectly centered kisses!
Candy Cane Hershey's Kiss Cookie

1 bag Hershey's Kisses brand Candy Cane Kisses
1/2 cup butter, softened
1 cup granulated sugar
1 1/2 teaspoons vanilla extract
1 egg
2 cups all purpose flour
1/4 teaspoon salt
1/4 teaspoon baking soda
2 tablespoons milk
Red and Green sprinkles or nonpareils

Preheat over to 350 degrees Fahrenheit. Remove wrappers from candies (approx. 35)

Beat butter, sugar, vanilla, and egg in large bowl until well blended. Stir together flour, baking soda and salt; add alternatively with milk to butter mixture, beating until well blended.

Shape dough into 1 inch balls. (I measured my dough with a Tablespoon to make sure all of my cookies turned out the same size) Roll in red and/or green sprinkles or nonpareils. Place on ungreased cookie sheet.

Bake 8 - 1o minutes or until edges are lightly browned and cookies is set. Remove from oven; cool 2 to 3 minutes. Press candy piece into center of each cookie. Remove from cookie sheet to wire rack. Cool completely. Yields approximately 35 cookies.

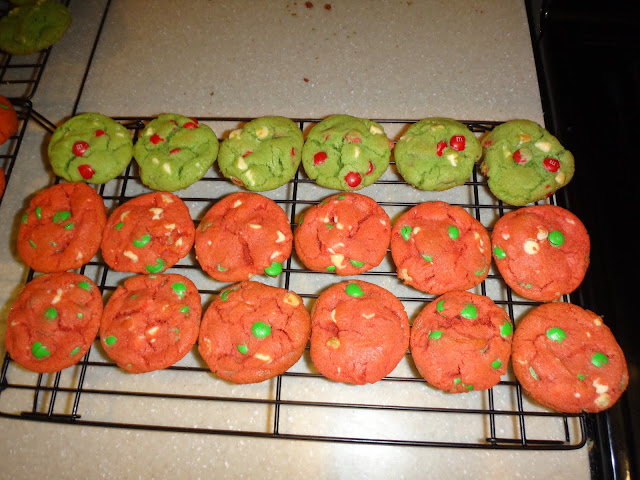
M&M Christmas Cookies

These M&M Christmas Cookies are so yummy! They have M&M's and white chocolate chips. How could they not be good? We loved them! And I loved letting Matias sort the red and green M&M's! I hope your family enjoys them as much as we did!


M&M Christmas Cookies

2 1/2 cup all purpose flour
1/2 tsp. baking powder
1/2 tsp. baking soda
1/4 tsp. salt
1 cup softened butter
1 cup sugar
1 cup brown sugar
2 tsp. vanilla
4 Egg yolks only
Green and red food coloring
1 bag red and green M&Ms, separated 
2 cup white chocolate chips

Mix flour, baking powder, baking soda and salt together.  In a separate bowl, mix butter, sugar, brown sugar and vanilla. On low speed, slowly add flour mixture to wet ingredients until combined. Add egg yolks and combine.
Separate batter in half.
To one half, add green food coloring and mix until well blended. Add red M&Ms and 1 cup white chocolate chips to green batter.
To the other half, add red food coloring and mix until well blended. Add green M&Ms and 1 cup white chocolate chips red batter.
Using a cookie scoop drop dough onto ungreased cookie sheet. Bake at 375° for 9-10 minutes. Remove cookies to cooling rack.

Christmas Sugar Cookies

I love baking and decorating cookies (and so do my kids)! So each week leading up to Christmas we made a different Christmas cookie. The first cookie was my Grandma's Sugar Cookie recipe. Titan got one cookie with icing and just picked off all of the icing while Matias and I finished icing the rest. It was so much fun and I love all of the memories we made! I've posted this cookie recipe before so here is the link to the recipe... Grandma's Sugar Cookies.

Tuesday, December 11, 2012

Sugar Cookies


This is my Grandma's Sugar Cookies recipe that has been used in my family for years! I have posted this recipe before. Out of all of the cookies I made for Thanksgiving, these are still my favorite! They also freeze really well. So usually when I bake them I freeze half of them for later.


Berry Shortbread Dreams


I LOVE these cookies! They are delicious! They are the perfect size and perfect sweetness. The tart raspberry jam and the almond extract in the cookie meld together perfectly! 
These cookies will melt in your mouth!

Sorry, I had already packaged these cookies before I realized that I hadn't taken a picture. Not the best picture.
Berry Shortbread Dreams

1 cup butter, softened
2/3 cup sugar
1/2 teaspoon almond extract
2 cups flour
1/3 to 1/2 cup seedless jam

Glaze:
1 cup powdered sugar
1/2 teaspoon almond extract
2 to 3 teaspoons water

In a large bowl, cream butter and sugar until light and fluffy. Beat in the extract; gradually add flour until dough forms a ball. Cover and refrigerate 1 hour or until dough is easy to handle. Roll into 1 inch balls. Place 1 inch apart on ungreased baking sheets. Using the end of a wooden spoon handle, make an indentation in the center. Fill with jam. Bake at 350 degrees for 14-18 minutes or until edges are lightly browned. Remove to wire racks to cool. Spoon additional jam into cookies if desired. Combine powdered sugar, extract and enough water to achieve drizzling consistency; drizzle over cookies. Enjoy!

Peanut Butter Sandwich Cookies

I have to admit that I do not like these cookies because I do not like peanut butter desserts of any sort. I like peanut butter & apples, peanut butter & bananas and peanut butter & jelly, but no peanut butter desserts. I made these cookies for my brother-in-law and sister-in-law. They were the first peanut butter cookies I had ever made! They said they were good! So if you like peanut butter desserts you will probably like these cookies!
The ones on the left have regular cream filling and the ones on the right have peanut butter cream filling.

Peanut Butter Sandwich Cookies

1 cup butter-flavored shortening
1 cup cream peanut butter
1 cup sugar
1 cup packed brown sugar
3 eggs
1 teaspoon vanilla extract
3 cups flour
2 teaspoons baking soda
1/4 teaspoon salt

Filling:
1/2 cup cream peanut butter
3 cups powdered sugar
1 teaspoon vanilla extract
5 to 6 Tablespoons milk

In a large bowl, cream the shortening, peanut butter and sugars until light and fluffy. Add eggs, one at a time, beating well after each addition. Add vanilla. Combine the flour, baking soda and salt; add to creamed mixture and mix well. Shape into 1 inch balls and place 2 inches apart on ungreased baking sheets. Flatten to 3/8 inch thickness with fork. Bake at 375 degrees for 7-8 minutes or until golden. Remove to wire racks to cool. For filling, in a large bowl, beat the peanut butter, powdered sugar, vanilla and enough milk to achieve spreading consistency. Spread on half of the cookies and top each with another cookie.

*I made my cookies slightly larger so I had to bake mine longer. But I think smaller is better with these cookies because they are so rich! So next time (if there is a next time) I will make them smaller.

*I also did half with peanut butter filling and half with just the powdered sugar, vanilla and milk filling.

This recipe was from Taste of Home Most Requested Recipes

Chocolate Chocolate Chip Cookies

Theses cookies are AMAZING! They have a chocolate dough and chocolate chips! But the best part is that they are so so chewy and soft! I hate crisp hard cookies so anytime I say a cookie is good that means its soft and chewy! 
I hope you enjoy these cookies as much as I do!


Chocolate Chocolate Chip Cookies

1/2 cup butter, softened
1 cup sugar
1/2 cup brown sugar
2 eggs
1 teaspoon vanilla
2 cups flour
1/3 cup cocoa
1 teaspoon baking soda
1/2 teaspoon salt
1 1/2 cups chocolate chips

Cream butter and sugars together until well blended and very light. Add eggs and vanilla; beat well. In a separate bowl, stir dry ingredients. Gradually add dry ingredients to butter mixture. Mix well. Add chocolate chips. Refrigerate dough for 1-2 hours. (if you want perfectly shaped cookies) Drop by rounded tablespoons full (or use a cookie scoop) onto greased cookie sheet about 2 inches apart. Bake at 350 degrees for 12-14 minutes. (I flip my pan around half way through baking to ensure even baking) Remove from oven and leave on pan for 2 minutes. Then transfer cookies to cooling rack. 

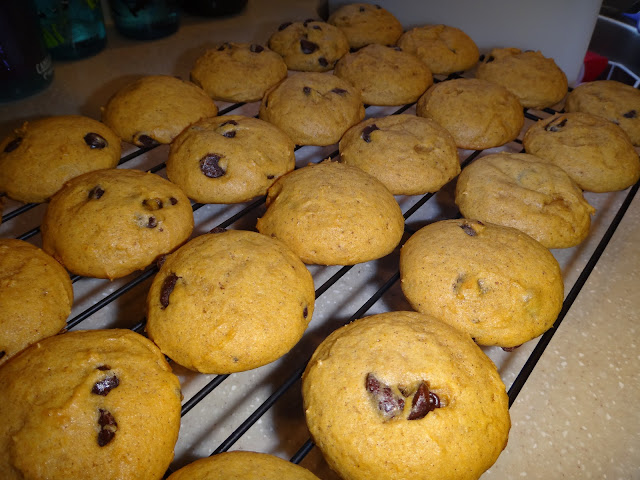
Pumpkin Chocolate Chip Cookies

I love these cookies around the holidays! They are incredibly moist and the nutmeg just adds a little something special! 
Hope you enjoy them!

Pumpkin Chocolate Chip Cookies

1/2 cup Butter
1 1/2 cups sugar
1 egg
1 cup canned pumpkin
1 teaspoon Vanilla
2 1/2 cups flour
1 teaspoon baking Powder
1 teaspoon baking Soda
1/2 teaspoon salt
1 teaspoon nutmeg
1 teaspoon cinnamon
1 cup chocolate chips

Cream butter and sugar. Add eggs, pumpkin and vanilla. Mix flour, baking powder, baking soda, salt, nutmeg and cinnamon. Add to pumpkin mixture and blend well. Add chocolate chips. Refrigerate for 1-2 hours. (If you want perfectly shaped cookies) Drop by rounded tablespoons (or use a cookie scoop) on to a well greased baking sheet. Bake at 350 degrees fro 15 minutes. I always flip my pan around half way through the baking time to ensure even baking. Enjoy!

Saturday, November 10, 2012

Make Ahead Breakfast

Pretty much every morning Peter asks me, "what's for breakfast?" To which I respond, "waffles, cereal, oatmeal, pop tarts, etc." He then looks at me with disappointment. See Peter is not a  big fan of breakfast food. And if he is going to eat breakfast food then he wants eggs, bacon, sausage or something hearty like that. The problem is that Peter is not a morning person. So he is not going to get up early just to make himself a breakfast like that and God knows, now that we have kids, I am not getting up early to make him a breakfast like that! (I made the mistake of doing this before we had kids) So today I created a solution to this problem! I made bacon, egg and cheese sandwiches  (12 of them) and froze them! It took me a total of 40 minutes to make all 12! And it was cheaper than buying them premade at the store! It only cost me $11.70 total to make all 12! That makes them $.98 each! Of course I had a $1 off coupon for the bacon and it was on sale for $2.89 at the Commissary so that helped. But even if I had paid $2 more for the bacon, the sandwiches would still be significantly cheaper than buying them at McDonalds. So now when my husband asks me what is for breakfast I have an answer that pleases him and saves us money!

Here is what you will need:
12 English muffins (I used whole grain)
12 slices of bacon (I used thick cut)
12 slices of cheese (I used cheddar)
12 eggs (I used organic)
milk (I used organic)
Cooking spray

Cut your English muffins in half and lay out on the counter. Place one slice of cheese on the top piece of the English muffin. Begin cooking your bacon. (I cooked mine in the microwave for the first time ever! Why had I never thought of this?) To cook in the microwave place a paper towel on a microwaveable plate. Lay bacon slices on paper towel so that they are touching but not overlapping. Place another paper towel over bacon and microwave for about 1 minute per slice. Remove bacon and let cool slightly. Cut each bacon piece in half and place on bottom half of English muffin so that each sandwich gets one whole slice of bacon. Once you are finished with the bacon start on your eggs. Being that I am a perfectionist I wanted to make sure my eggs were the same size and shape of my English muffins so I used a Pyrex 1 cup measuring cup to cook my eggs in. You could make an omelet if you wanted to and just cut the egg in pieces to fit on the sandwich. (that is if you don't want them to look perfect like mine) To microwave eggs in Pyrex 1 cup measuring cup, spray cooking spray into cup, crack one egg into cup, add about 3/4 tsp of milk (give or take) and beat with a fork until blended. Microwave for about 1 minute. Remove from microwave and ever so gracefully flip the egg out onto the bottom half of the English muffin (on top of the bacon). Use a fork to gently flatten the egg so that it almost meets the edge of the English muffin. Continue doing this until you have cooked all 12 eggs. Assemble your sandwiches and place them on a baking sheet. Place them in the freezer for 20-30 minutes. (I'm not sure this step is necessary. I might skip this step next time.) Remove from freezer, wrap each in a paper towel and place in a freezer bag. Freeze. When ready to eat, remove from freezer and microwave in paper towel until heated through.


Cooking bacon in the microwave! So easy!

The only thing missing in this pic is the cooking spray. Make sure you use it before putting eggs into cup.
Ta-daa!
Letting them freeze for 30 minutes.

All done!

Monday, February 13, 2012

Valentine's Day Sugar Cookies

Yet another Valentine's Day goodie! This recipe has been tested multiple times because it has been passed down through 3 generations. I guarantee you they will be the best sugar cookies you have ever eaten! The sour cream keeps them moist and the lemon extract adds a little something special. Hope you enjoy!

Sour Cream Sugar Cookies

1 1/2 cups sugar
1 cup shortening (regular or butter flavor)
2 eggs, unbeaten
3 Tablespoons sour cream
1 teaspoon vanilla
1/2 teaspoon lemon extract
3 cups all purpose flour
1/2 teaspoon baking soda
1/2 teaspoon salt

Icing:
Powdered sugar
water
food coloring

Gradually add sugar to shortening, creaming until fluffy. Beat in eggs one at a time. Add sour cream and flavorings. Stir in flour sifted with baking soda and salt. (I don't sift mine) Mix well. Chill in fridge. (The dough is easier to work with if it has been chilled.) Roll out small amount of dough at a time on a lightly floured surface. (I roll mine out very thick. Maybe 1/8 inch?) Cut with various shaped cookie cutters. Place on a non-greased baking sheet. Bake at 400 degrees for 8-10 minutes. (varies depending on your thickness so watch them carefully the first time you make them and adjust the recipe accordingly) Makes about 2-3 dozen thick cookies. I usually make a couple different colors of icing. Divide the powdered sugar into desired number of bowls. Add coloring of choice. Add water until you reach your desired consistency. (And try not to eat too much icing while decorating your cookies. It will make you sick! I know from experience)

Cherry Donuts

Another Valentine's Day goodie! I love donuts! They are my number one weakness! And since I have joined Pinterest I have pinned a lot of donut recipes. This past weekend I finally bought a donut pan! The next morning we had these donuts for breakfast. They are amazing! I adapted the recipe from HoosierHomemade.com. If you don't own a donut pan, you need to get one ASAP so you can bake these little gems!
Yum!
Filling the pan can be messy if you aren't careful.... I was not careful.


Cherry Donuts
  • Donuts:
  • 2 cups flour
  • 3/4 cup sugar
  • 1 teaspoon baking powder
  • 1 teaspoon baking soda
  • 1 teaspoon salt
  • 1/2 teaspoon ground nutmeg
  • 2 eggs
  • 1 teaspoon vanilla
  • 3/4 cup milk
  • 2 tablespoons butter, melted
  • 15 maraschino cherries, chopped
  • Glaze:
  • 1 cup powdered sugar
  • 1/2 teaspoon maraschino cherry juice
  • 5-6 tablespoons milk
  1. Preheat oven to 325 degrees
  2. In a large bowl, combine dry ingredients; flour, sugar, baking powder, baking soda, salt and nutmeg. Whisk together until combined.
  3. Add eggs, melted butter, vanilla and milk. Mix well.
  4. Fold in chopped cherries.
  5. Place a large resealable bag in a tall glass and fill bag with batter, close tightly.
  6. Snip off corner, pipe batter into doughnut pan.
  7. Fill only 1/2 full, making sure not to cover the inside hole with batter.
  8. Bake for 8-10 minutes, cool completely.
  9. Add powdered sugar and cherry juice to small bowl, gradually add milk a little at a time until desired consistency. If you want to spread your icing use less milk. If you want to dip the donuts in the icing (like I did) use more milk.
  10. Frost doughnuts or hold upside down and dip.

Cranberry White Chocolate Bars

I LOVE Valentine's Day! My mom always made Valentine's Day special growing up. We always had a special candle light dinner as a family with some of our favorite foods! So I always like to bake a lot of heart shaped goodies and pink stuff! This is the first heart shaped goodie I made this year! If you have ever had Starbucks Cranberry Bliss bars then you will love these! They taste just like it and are much easier to make than I ever expected!


Cranberry White Chocolate Bars

1 cup (2 sticks) unsalted butter (slightly softened)
1 1/4 cups brown sugar
3 eggs
1 1/2 teaspoons vanilla
2 teaspoons fresh orange zest
1 1/2 cups all purpose flour
1 teaspoon powdered ginger
1/2 teaspoon salt
1/2 teaspoon baking soda
3/4 teaspoon baking powder
3/4 cup dried, sweetened cranberries, chopped
6 ounces (about 3/4 cup) white chocolate chips
Frosting: 
4 ounces cream cheese, softened
2 Tablespoons butter
2 cups powdered sugar
1/2 teaspoon vanilla
1 teaspoon orange extract
Topping:
1/2- 2/3 cup dried, sweetened cranberries, chopped
2 ounces white chocolate, melted

Preheat oven to 350 (F) degrees.  Grease a 9 x 13 pan then set aside (I also like to line the pan with parchment paper, leaving some hanging over the two long sides- this allows the bars to be pulled out of the pan after baking for easier cutting). In a medium bowl add the flour, powdered ginger, salt, baking soda and baking powder.  Set bowl aside.
 In a large bowl, cream the butter and brown sugar until smooth.  Add eggs, vanilla, and orange zest and mix well.  Gradually add the flour mixture and blend until combined. Stir in cranberries and white chocolate.  Pour the batter into prepared pan and spread evenly.   Bake 25-30 minutes, until edges are light brown and a toothpick inserted in the center comes out clean. Prepare frosting by beating the cream cheese and butter together until smooth.  Add the powdered sugar, vanilla and orange extract.  Beat about 1 minute until fully incorporated. Assemble dessert by spreading the frosting onto the baked and cooled bars. At this point you can take a heart shaped cookie cutter and press it into the bars. Remove heart shaped bars and place in a 9 x13. Sprinkle additional cranberries on top.  Drizzle melted white chocolate on top as desired.