Saturday, January 26, 2013

Soft Cake-Like Chocolate Chip Cookies

You know how you sometimes make mistakes when baking? Like you run out of an ingredient? Like you already started making a batch of cookies before you realized you didn't have enough all-purpose flour? Well, that happened to me yesterday. And it was the best mistake I ever made! I have been making the same Soft & Chewy Chocolate Chip Cookie recipe from Pillsbury for years! They have always been so good! However, they are now better than ever before because of my mishap in the kitchen yesterday. I had the urge to bake chocolate chip cookies yesterday. I usually keep all of the ingredients I would need for this on hand at all times. (like any good baker should) I got the kids helping and we started mixing! We mixed the sugars, butter, vanilla and eggs... then came the flour. I opened my flour canister and knew right away that we did not have 4 1/4 cups of all-purpose flour... I know, it calls for a lot. So I started measuring and we ended up with 3 1/4 cups. I decided to add a cup of self-rising flour in place of the all-purpose flour... ingenious! The cookies puffed up so much more and have more of a cake-like texture to them but are still incredibly soft! Best mistake ever! Here is the new recipe!


Soft Cake-Like Chocolate Chip Cookies
Yield: 5 Dozen

1 1/4 cups sugar
1 1/4 cups firmly packed brown sugar
1 1/2 cups butter or margarine, softened (I recommend unsalted stick butter)
2 teaspoons vanilla
3 eggs
3 1/4 cups all-purpose flour
1 cup self-rising flour
2 teaspoons baking soda
1/2 teaspoon salt
1-2 (12 oz) packages semi-sweet chocolate chips (I added a few white chocolate chips)

In a large bowl, beat sugars and butter until light and fluffy (very important that you get to the "light and fluffy" state. Otherwise they will not rise as well). Add vanilla and eggs; blend well. Add flours, baking soda and salt; mix well. Stir in chocolate chips. Cover and refrigerate dough for at least 3 hours or overnight. (If you do it overnight you may need to remove your dough about 30 minutes prior. The dough will be too stiff for your cookie scoop and it may break your scoop... I know this from experience.) Use a cookie scoop to measure and shape your dough. Place on an ungreased cookie sheet about 2 inches apart. Bake at 375 degrees for 10 minutes (I bake mine for 5 minutes and then flip the tray around and bake for an additional 5 minutes to ensure they bake evenly.) You want them lightly browned. Let cool on pan for 2 minutes. Remove from pan to wire rack. Cool completely... or grab one and dunk it in some cold milk while it is still hot! HEAVENLY! 

Friday, January 18, 2013

Freezer Meals

Here are some freezer meals that will help make your life easier and allow you to spend more time with your little ones!

Chicken or Turkey Potpie (modified from Taste of Home Most Requested Recipes)
*Sorry no picture! Y'all know what potpies look like anyway!

2 medium potatoes, peeled and cut into 1-inch pieces
3 medium carrots, cut in to 1-inch slices
1 medium onion, chopped
2 Tbsp butter
1 Tbsp Olive Oil
6 Tbsp all-purpose flour
3 cups chicken broth
4 cups cubed cooked turkey or chicken
2/3 cup frozen peas
1 cup frozen corn
1/2 cup plus 1 Tbsp heavy whipping cream, divided
1 Tbsp minced fresh parsley
1 tsp garlic salt
1/2 tsp pepper
2 pie crusts (store bought or homemade)
1 egg

In a dutch oven, saute the potatoes, carrots and onion in butter and olive oil until tender. Stir in flour until blended; gradually add broth. Bring to a boil; Cook and stir for 2 minutes or until thickened. Stir in the turkey or chicken, peas, corn, 1/2 cup cream, parsley, garlic salt and pepper.
Spoon into two ungreased 9-inch pie plates. Roll out pastry to fit top of each pie; place over filling. Trim, seal and flute edges. Cut out a decorative center or cut slits in the pastry. In a small bowl, whisk egg and remaining cream; brush over pastry.
Cover and freeze potpies for up to 3 months. To cook: Remove from freezer 30 minutes before baking. Cover edges or crust loosely with foil; place on a baking sheet. Bake at 425 degrees for 30 minutes. Reduce heat to 350 degrees, remove foil. Bake additional  55-60 minutes or until golden brown.

Cheesy Chicken & Rice Casserole (modified from Dream Dinners)
*Sorry, no picture again!

*This recipe is for three 9x13 meals. If you don't want to make that much just reduce your ingredients accordingly.

4 1/2 cups uncooked white rice
3 16oz. bags frozen corn kernels
3 cups diced carrots (I added these. It needed some veggies!)
6 cups (1.5 lbs) Shredded mexican cheese
6 cups cooked chicken breast, diced
3 cups yellow onions, diced
3 Tbsp sugar
2 Tbsp Kosher salt
2 Tbsp Chili powder
2 Tbsp Paprika
6 cups milk
1 1/2 cups water

Spray three 9x13 baking dishes with nonstick cooking spray.
Put the rice, corn, carrots, cheese, chicken and onions in a large bowl and mix together. In a separate bowl combine the sugar, salt, and chili powder. Divide the rice mixture equally among the three dishes. Sprinkle equal amounts of the chili powder mixture over each. Sprinkle the paprika on top. Pour 2 cups milk into 3 resealable bags and seal. place one bag of milk on top of each baking dish. Cover the dish with plastic wrap and heavy-duty aluminum foil. Label, date and freeze for up to 3 months.

To cook: Thaw in the refrigerator. Pour milk into the baking dish. Bake, covered at 350 degrees for 1 1/2 hours or until the cheese begins to bubble. Remove foil, gently stir to combine ingredients. Cover and bake an additional 20-30 minutes until all liquid is absorbed and rice is tender.

Here is a link to my Southwestern Egg Rolls! I love this freezer recipe because I can pull out one or two at a time. I like to get them out for lunch with my boys! I actually do have a pic of these on the link!

If you are looking for Crockpot Freezer Meals just click on the link! I cheated on this one. I haven't come up with my own recipes yet. I quickly did a search on pinterest about 20 minutes before I was headed to the Commissary and this is what I found... I made: Teriyaki Chicken, Lazy Day Stew and Sausage & Peppers!

Wednesday, December 19, 2012

Candy Cane Hershey's Kiss Cookies

I kind of came upon this recipe accidentally. I needed to buy some chocolate Hershey's kisses for another recipe. But I had a coupon for $1.10 off 2 and they were on sale so I had to buy 2 bags. I thought I would try the candy cane kisses and I am so glad I did! The recipe is actually on the back of the package and it is amazing! I used green and red sprinkles and nonpareils instead of colored sugar like they recommend but otherwise I followed the recipe. I think you could use any kind of sprinkle you like as long as they aren't too big. These cookies do not only taste good but are also very cute! I just love a cute yummy cookie!


Matias helped me put the kisses in place so sorry if they aren't perfectly centered kisses!
Candy Cane Hershey's Kiss Cookie

1 bag Hershey's Kisses brand Candy Cane Kisses
1/2 cup butter, softened
1 cup granulated sugar
1 1/2 teaspoons vanilla extract
1 egg
2 cups all purpose flour
1/4 teaspoon salt
1/4 teaspoon baking soda
2 tablespoons milk
Red and Green sprinkles or nonpareils

Preheat over to 350 degrees Fahrenheit. Remove wrappers from candies (approx. 35)

Beat butter, sugar, vanilla, and egg in large bowl until well blended. Stir together flour, baking soda and salt; add alternatively with milk to butter mixture, beating until well blended.

Shape dough into 1 inch balls. (I measured my dough with a Tablespoon to make sure all of my cookies turned out the same size) Roll in red and/or green sprinkles or nonpareils. Place on ungreased cookie sheet.

Bake 8 - 1o minutes or until edges are lightly browned and cookies is set. Remove from oven; cool 2 to 3 minutes. Press candy piece into center of each cookie. Remove from cookie sheet to wire rack. Cool completely. Yields approximately 35 cookies.

M&M Christmas Cookies

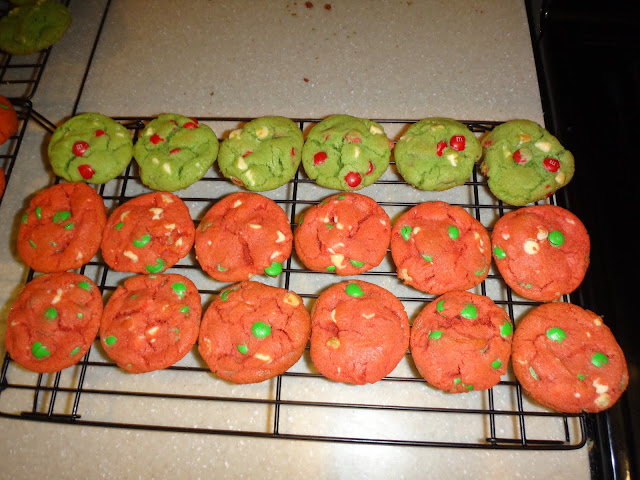
These M&M Christmas Cookies are so yummy! They have M&M's and white chocolate chips. How could they not be good? We loved them! And I loved letting Matias sort the red and green M&M's! I hope your family enjoys them as much as we did!


M&M Christmas Cookies

2 1/2 cup all purpose flour
1/2 tsp. baking powder
1/2 tsp. baking soda
1/4 tsp. salt
1 cup softened butter
1 cup sugar
1 cup brown sugar
2 tsp. vanilla
4 Egg yolks only
Green and red food coloring
1 bag red and green M&Ms, separated 
2 cup white chocolate chips

Mix flour, baking powder, baking soda and salt together.  In a separate bowl, mix butter, sugar, brown sugar and vanilla. On low speed, slowly add flour mixture to wet ingredients until combined. Add egg yolks and combine.
Separate batter in half.
To one half, add green food coloring and mix until well blended. Add red M&Ms and 1 cup white chocolate chips to green batter.
To the other half, add red food coloring and mix until well blended. Add green M&Ms and 1 cup white chocolate chips red batter.
Using a cookie scoop drop dough onto ungreased cookie sheet. Bake at 375° for 9-10 minutes. Remove cookies to cooling rack.

Christmas Sugar Cookies

I love baking and decorating cookies (and so do my kids)! So each week leading up to Christmas we made a different Christmas cookie. The first cookie was my Grandma's Sugar Cookie recipe. Titan got one cookie with icing and just picked off all of the icing while Matias and I finished icing the rest. It was so much fun and I love all of the memories we made! I've posted this cookie recipe before so here is the link to the recipe... Grandma's Sugar Cookies.

Tuesday, December 11, 2012

Sugar Cookies


This is my Grandma's Sugar Cookies recipe that has been used in my family for years! I have posted this recipe before. Out of all of the cookies I made for Thanksgiving, these are still my favorite! They also freeze really well. So usually when I bake them I freeze half of them for later.


Berry Shortbread Dreams


I LOVE these cookies! They are delicious! They are the perfect size and perfect sweetness. The tart raspberry jam and the almond extract in the cookie meld together perfectly! 
These cookies will melt in your mouth!

Sorry, I had already packaged these cookies before I realized that I hadn't taken a picture. Not the best picture.
Berry Shortbread Dreams

1 cup butter, softened
2/3 cup sugar
1/2 teaspoon almond extract
2 cups flour
1/3 to 1/2 cup seedless jam

Glaze:
1 cup powdered sugar
1/2 teaspoon almond extract
2 to 3 teaspoons water

In a large bowl, cream butter and sugar until light and fluffy. Beat in the extract; gradually add flour until dough forms a ball. Cover and refrigerate 1 hour or until dough is easy to handle. Roll into 1 inch balls. Place 1 inch apart on ungreased baking sheets. Using the end of a wooden spoon handle, make an indentation in the center. Fill with jam. Bake at 350 degrees for 14-18 minutes or until edges are lightly browned. Remove to wire racks to cool. Spoon additional jam into cookies if desired. Combine powdered sugar, extract and enough water to achieve drizzling consistency; drizzle over cookies. Enjoy!